Library Contents Search the Library RV Tech Library Help Page Site Map About Us Tiffin RV Network TRVN Classifieds Campground Reviews Photo Gallery TRVN Store
Appliances Batteries Boondocking/Dry Camping Chassis Clubs & Forums Electrical Electronics Engines Exterior Maintenance Generators Heating & Air Conditioning Interior Maintenance Misc Items Operating Tips Plumbing Red Bay Safety & Health Storage Supplier Contacts Tires and Wheel Rims Towing Transmissions Weighing
![]()
Freightliner Ride Height Control Valve Adjusting
I have recently been asked to explain the procedure for adjusting the ride height on a Freightliner chassis. I will use my chassis as an example it is a 2007 XC chassis with a 40 foot Phaeton coach. My chassis has three height control valves, one on the front driver's side of the axle and two on the rear axle one on each side. The front height control valve is used to adjust the ride height on the front axle both left and right sides. The two control valves on the rear axle are adjusted simultaneously. Adjusted one side of the rear axle will affect the height of the opposite side of the rear axle. So it takes a little tweaking back and forth to get good results.
Make sure to follow the above instructions, the last two sentences of # 4 are very important. Always adjust the height control valves while INFLATING the air bags never adjust while DEFLATING the air bags.
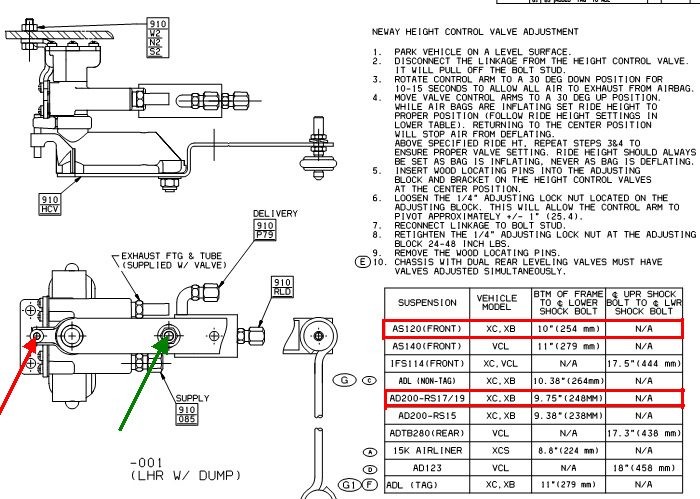
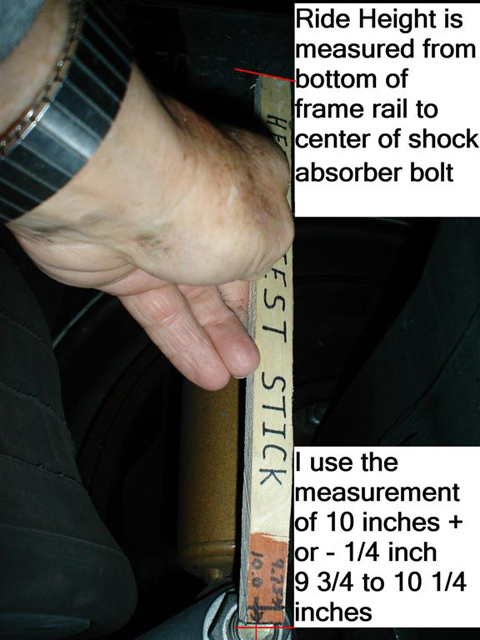
My coach has the AS120 front axle which means the proper height is 10 inches, measured from the bottom of the frame rail to the center of the shock absorber bolt. The rear axle is the AD200-RS17/19 its ride height is 9 3/4 inches again measured from the bottom of the frame rail to the center of the shock absorber bolt.
The wood locating pin referred to in # 5 and # 9 is actually a wooden golf tee, it is denoted by the red arrow and its location when installed. The 1/4 inch adjusted lock nut is denoted by the green arrow.
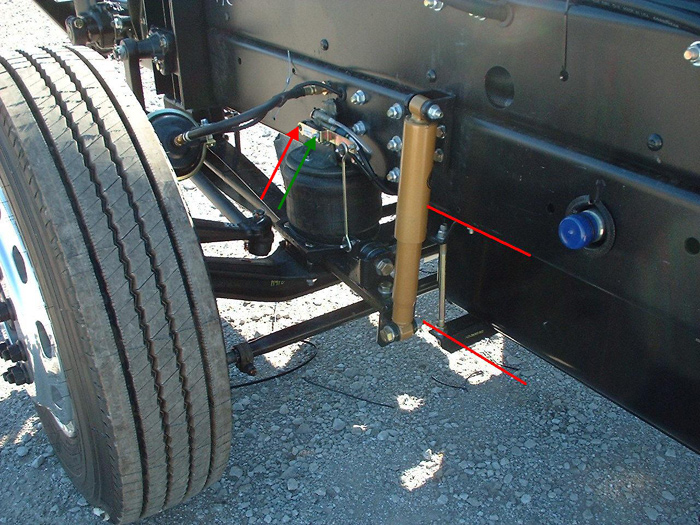
The distance between the two red lines by design is 10 inches on my XC-R chassis. I have taken a small piece of plywood and made me a ride height test stick. Its simple to make I made it 10 inches long and marked 9 3/4 inches on it. I place one end of the stick against the bottom of the frame rail and adjust the height control valve until the opposite end of the stick is centered on the shock absorber bolt.
That is all there is to adjusting your ride height control valves. It gets easier after a few times. I just adjust both front and rear control valves to 10 inches or as close as I can get them adjusted to 10 inches.
Submitted by Ted Bryan - 6/12/09
The RV Tech Library is brought to you by the TiffinRVnetwork
Absolutely No Affiliation exists between this group and Tiffin Motor Homes Inc or the Allegro Club. This website neither endorses or discourages the use or purchase of a Tiffin product. All references, suggestions, comments, etc. contained herein are the opinions/experiences of the posters and not those of Tiffin Motor Homes Inc. or the website administrators.
|
|