Library Contents Search the Library RV Tech Library Help Page Site Map About Us Tiffin RV Network TRVN Classifieds Campground Reviews Photo Gallery TRVN Store
Appliances Batteries Boondocking/Dry Camping Chassis Clubs & Forums Electrical Electronics Engines Exterior Maintenance Generators Heating & Air Conditioning Interior Maintenance Misc Items Operating Tips Plumbing Red Bay Safety & Health Storage Supplier Contacts Tires and Wheel Rims Towing Transmissions Weighing
![]()
Allison Transmissions
Allison transmissions are the heavy duty beasts that you'll typically find in a class A motorhome. They come in a large range of sizes, from the Allison 1000 up through the Allison 4000 series. Each model is capable of handling more torque and horsepower so you'll find that whichever one you happen to have will be best suited for your engine and GVW rating. For more detailed information on the various ratings please check out the Allison Transmission Specifications document on this website.
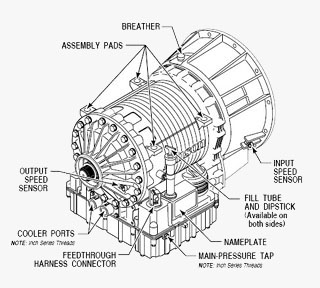
There are a few distinct differences in servicing the various models. The Allison 1000 series, commonly used in the smaller Workhorse chassis uses a simple spin-on oil filter and doesn't hold as much oil as the larger 3000 series used in most diesel pushers. The larger transmissions also use insertable cartridge style filters as well as a fairly hefty oil supply. For exact instructions on servicing your Allison transmission please be sure to refer to your owners manual to ensure that you are getting the exact requirements for your specific year and model of transmission.
Do note that an initial transmission filter change is required on all Allison transmissions at 5,000 miles. On the larger Allison 3000 series there are two filters, a primary and a secondary. It is only necessary to change the primary filter at this initial service. Allison requires this to keep from voiding your warranty and it's intended to remove any contaminants that have entered the system during manufacturing or during the initial break-in period. After that you can continue on your regular scheduled service intervals.
There's lots on misinformation floating around as to when to service your transmission. Rather than take this advice why not go right to the source? Allison has a service interval calculator right on their website. You just select your transmission model, answer a few questions, and they'll tell you exactly what is required. It's the best source of information and you can find it by selecting the following link:
Allison Service Interval Calculator
There is a difference in service intervals, depending upon whether or not you are running the generic Dexron style C-4 fluid or the synthetic Transynd fluid. Allison recently opened up the requirements to allow some other synthetic fluids to be used. However, not all are approved. They must meet Allison's TES-295 specifications in order to be listed on the approved list. Information on these fluids can be found at the Approved Allison TES-295 Fluids link. Freightliner began installing Transynd fluid in their chassis as of 1/2/04. If you have this fluid you can use the extended service intervals. There should be a decal near the transmission dipstick tube stating to only fill with Transynd if this is the case.
Servicing an Allison 1000 with a spin-on filter isn't that much different than changing oil on your car's engine. If you have an Allison 3000 it's a bit more involved but it's really not that bad. The following procedure to change fluid or filters on an Allison 3000 transmission was submitted by Herb Peterson:
TRANSMISSION FLUID CHANGE PROCEDURES:
If you can change oil on a car you can change the tranny filters on the D. The kit consists of two filters, two sets of gaskets and three sets of rings. There are two pair of round (looking of a cross section of the O ring) O-rings and some square ones which are called square cuts. Part number is Allison - Kit, Filter 29526899. We have the short 2" pan.
Most of the oil does drain from the plug and you don't remove the pan (control module), instead, each filter has it's own cover which will leak some fluid when removed.
The filter kit comes with a diagram for changing the filters, albeit a small one. Our transmission is a MD 3060.
Here are the step-by-step instructions:
- If you are only changing the filters, don't drain the fluid. If you are draining the fluid make sure it is at operating temperature, between 160 to 200 degrees, it's recommended and it will drain quicker, it's also hot on the skin! So Be Careful!
- Get a big drain pan which holds at least three gallons, put it under the drain plug and filter covers.
- Remove the drain plug from the control module. As I mentioned above, the control module is what we would call the "pan" on a car transmission. Let it drain into the drain pan. There is a 3/8" square hole in the drain plug, just use a 3/8 drive and the male end of a 3/8" extension.
- Remove the 12 bolts, six on each cover.
- Remove the two filter covers from the bottom of the control module, they will come straight down and may require "coaxing". Don't use anything that will cut or dent the covers!
- Remove the filter from one cover only.
- Remove all the O-rings from that one cover. Use the other one as a guide 'til all the new rings are in place.
- Lubricate and install the O-rings on that cover. Use whatever new O-rings match the old O-rings, there may be extra new parts.
- Reinstall the new filter on that cover.
- Repeat steps 5 - 8 on the other cover.
- On my transmission it had gaskets on each cover, instead of the square cut seals. Depending on the model of your tranny and when it was made, this can vary, that's why I say put on whatever you took off.
- Reinstall the covers into the control module, press them up into place until they are seated. Don't use the bolts to draw them into place as this can damage the covers or strip the threading in the bolt holes.
- Reinstall the 12 bolts and torque them to 38 - 45 ft-lbs. If you don't have a torque wrench, just tighten it "very" hand tight with the appropriate box wrench. If you were to use a socket with a long handle you can easily over-torque and therefore strip bolt holes. (I like to use the criss-cross method of torquing bolts to avoid warping the cover. I tighten 1 bolt to half specs, then do the opposite one, then back to the one next to the first one, then across, etc. Once all around I repeat to full torque. Like you would do on a wheel or head bolts, probably overkill as the covers are so small, but I like to stay in the habit).
- If you removed the drain plug, and on the first time you will, make sure the drain plug and it's O-ring is OK and replace it. Tighten this to 18 24 lb ft.
- Refill the fluid. On our units it should take 14 quarts. I would add three gallons, start the engine and check the fluid from the transmission console. Then add any more fluid if needed. Rely on the electronic console and not on the dip stick.
- Clean up and have a beer or the beverage of your choice.
Allison does have a streaming web video on their website that will train you in the proper use and care for your motorhome's Allison transmission. If you want to view this video it's in the lower-right hand corner of that webpage at www.allisontransmission.com/product/commercialtransmissions/recreational/index.jsp or else you can select the following link:
Allison Motorhome Training Video
Submitted by Mike Sundberg and Mark Quasius - 3/29/06
The RV Tech Library is brought to you by the TiffinRVnetwork
Absolutely No Affiliation exists between this group and Tiffin Motor Homes Inc or the Allegro Club. This website neither endorses or discourages the use or purchase of a Tiffin product. All references, suggestions, comments, etc. contained herein are the opinions/experiences of the posters and not those of Tiffin Motor Homes Inc. or the website administrators.
|
|